JavaWeb
参考教程:https://www.bilibili.com/video/BV12J411M7Sj/
JavaWeb是编写动态网页的方法,相对应的,HTML、CSS则是编写静态网页的方法。
JavaWeb包括如下几种实现:
1 ASP:微软开发。直接在HTML中嵌入VB代码,调试难度高。
2 PHP:代码简单,容易实现。但难以承载高访问量。
3 JSP/Servlet:Sun公司开发。语法类似于ASP,能够承载高访问量。
1 Tomcat
Tomcat是一种开源 的服务器程序,适用于轻量级 企业应用开发。
Tomcat为HTML服务,但实际上运行的是JSP和Servlet。
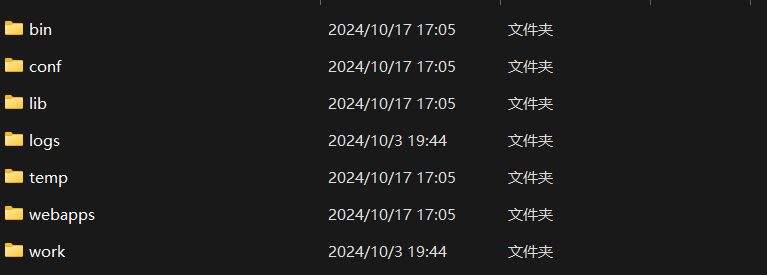
Tomcat根目录文件解析
bin——脚本:启动、运行服务器等操作
1
2
startup.bat -- 开启
conf——配置文件:配置端口号、域名等
1 2 默认端口:8080
在此处可以修改 tomcat 域名 和 端口号
1 2 3 4 5 6 7 <Connector port ="8080" protocol ="HTTP/1.1" connectionTimeout ="20000" redirectPort ="8443" maxParameterCount ="1000" /> <Host name ="localhost" appBase ="webapps" unpackWARs ="true" autoDeploy ="true" >
webapps——Web应用:每个文件夹对应一个应用
在Webapps中,有tomcat的5个默认web应用:
1
2
3
examples——tomcat 实例
2 HTTP
2-1 文本传输协议
HTTP(超文本传输协议)是一种简单的请求-响应协议,通常运行在TCP之上。
HTTPS 相比 HTTP 更安全
2-2 请求行
Get:携带的参数较少,大小有限制,会在浏览器URL行显示参数,不安全,但高效
Post:携带的参数没有限制,大小没有限制,不会在浏览器URL行显示参数,不安全,但高效
2-3 消息头
请求www.baidu.com的消息头
1 2 3 4 5 6 connection : keep-alivecontent-encoding : gzipaccept : text/html,application/xhtml+xml,application/xml;q=0.9,image/avif,image/webp,image/apng,*/*;q=0.8,application/signed-exchange;v=b3;q=0.7accept-encoding : gzip, deflate, br, zstdaccept-language : zh-CN,zh;q=0.9,en;q=0.8,en-GB;q=0.7,en-US;q=0.6host : www.baidu.com
2-4 常见响应状态码
200:请求响应成功
3xx:请求重定向
404:资源不存在
5xx:服务器错误
3 Maven
Maven 是一个项目管理工具,它包含了一个项目对象模型
(POM:Project Object Model)
它的主要功能有:
标准化的项目结构
标准化的构建流程(编译,测试,打包,发布……)
对 jar 的统一管理
3-1 配置Maven下载镜像
idea自带的Maven放置在:JetBrainsIDEA 2024.2.2 目录下
进入maven3文件夹,修改.xml 中的配置为:
1 2 3 4 5 6 7 8 9 10 11 12 13 14 15 16 17 18 19 20 <mirrors > <mirror > <id > aliyunmaven</id > <mirrorOf > *</mirrorOf > <name > 阿里云公共仓库</name > <url > https://maven.aliyun.com/repository/public</url > </mirror > <mirror > <id > huaweicloud</id > <mirrorOf > external:*,!aliyunmaven</mirrorOf > <name > 华为云公共仓库</name > <url > https://mirrors.huaweicloud.com/repository/maven/</url > </mirror > <mirror > <id > apachemaven</id > <mirrorOf > external:*,!aliyunmaven,!huaweicloud</mirrorOf > <name > apache公共仓库</name > <url > https://repo.maven.apache.org/maven2</url > </mirror > </mirrors >
3-2 配置Maven本地仓库
1 2 3 4 5 6 7 <localRepository > D:\JetBrains\IntelliJ IDEA 2024.2.2\plugins\maven\lib\maven3\maven-repo</localRepository >
在setting.xml的此处添加仓库地址,jar包将被保存在这。
3-3 在IDEA中使用Maven
首先,在IDEA中创建一个Maven项目
Maven Archetype 选择
org.apache.maven.archetypes:maven-archetype-webapp
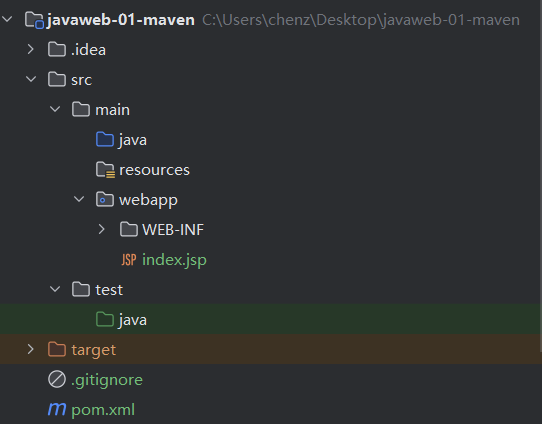
然后,我们得到如下的项目。
src ---- 编译前(源文件)
main ---- 主程序
java ---- 存放java源代码
resources ---- 资源文件
webapp ---- 网页APP
WEB-INF ---- 配置文件
index.jsp ---- 默认网页
test ---- 调试程序
target ---- 编译后
3-4 在IDEA中配置Tomcat
在IDEA中新建一个Run/Debug Configurations,选择Tomcat
Server/local。
此时下方会显示:
这是因为没有正确配置启动网页。这里按Fix,会自动跳转到配置页面:
这里我们新建了一个启动路径。此处可以配置Application
context,如下。
这会改变网页的URL,变为:localhost:8080/welcome/
3-5 在Maven中导入Jar包
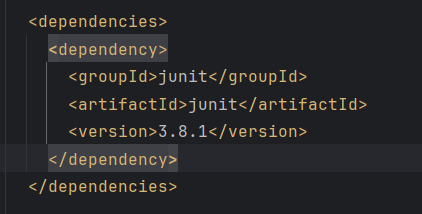
在Maven项目的根目录下,pom.xml中说明了各种项目配置。
比如,这里我们就导入了junit这个测试用的jar包。
我们也可以在Maven Repository:
Search/Browse/Explore 中搜索各种所需jar包的dependency格式。
比如,
1 2 3 4 5 <dependency > <groupId > org.springframework</groupId > <artifactId > spring-context</artifactId > <version > 6.2.0</version > </dependency >
pom.xml修改后,Maven会自动安装所依赖的jar包。
如果不需要某个包,也可以直接删除对应的dependency。
4 Servlet
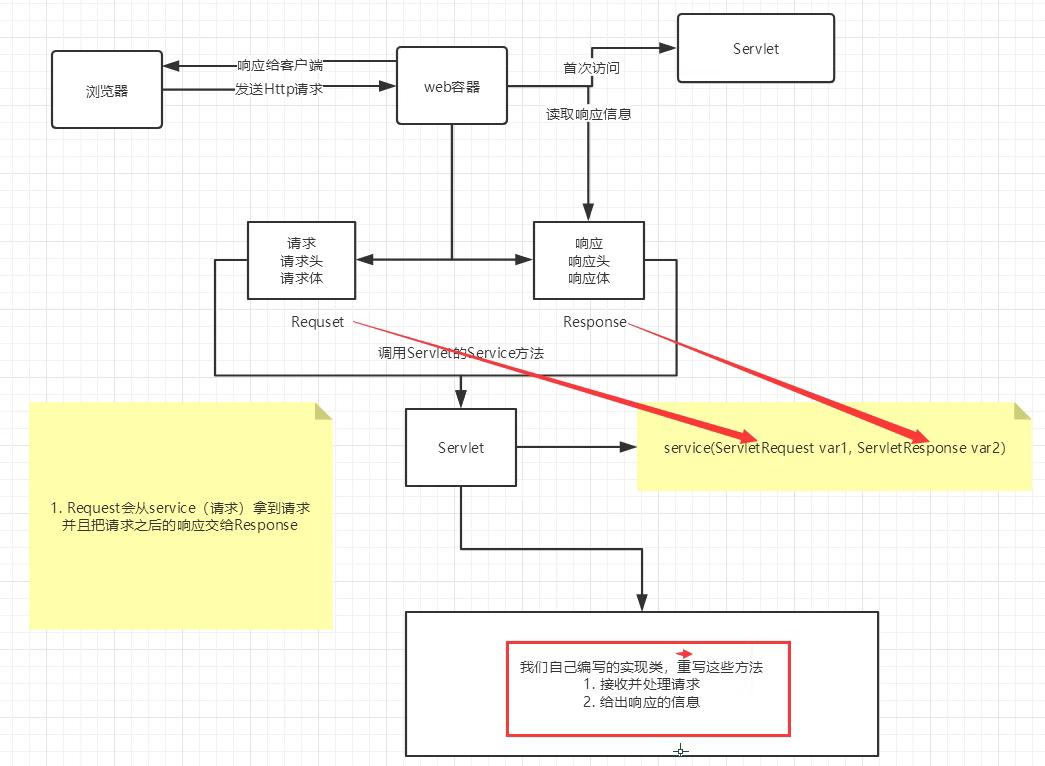
4-1 Servlet原理
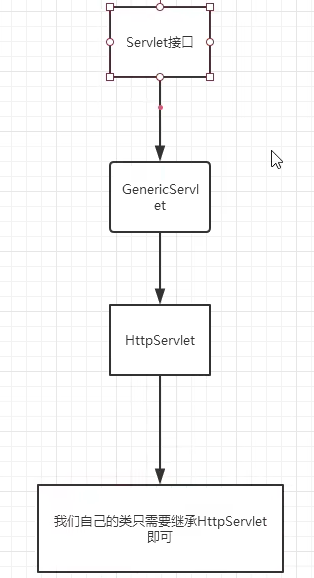
Sun公司提供了一个Servlet接口,用于实现动态Web。
在用户向Web服务器发送请求时,会首先调用Servlet实现类。
这个实现Servlet接口的java类,被称作Servlet。
Servlet继承图
4-2 WEB子项目
在IDEA的Project中创建Module,同样选择maven
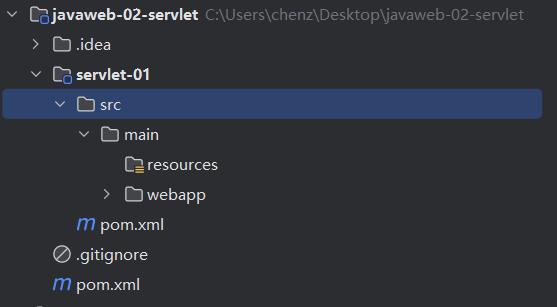
webapp模板,就在父项目下创建了子项目,比如,这里创建在javaweb-02-servlet下创建了servlet-01子项目。
子项目同样具有pom.xml配置。此外,在pom.xml中也配置了项目关联信息。
父项目pom.xml:
1 2 3 <modules > <module > servlet-01</module > </modules >
子项目pom.xml:
1 2 3 4 5 <parent > <groupId > org.example</groupId > <artifactId > javaweb-02-servlet</artifactId > <version > 1.0-SNAPSHOT</version > </parent >
子项目中的类被允许继承父项目中的类。
4-3 Servlet映射
为了让Web服务器找到对应的Servlet,我们需要建立 URL 到 Servlet
的映射。
该映射可以在web.xml中编写,如下。
1 2 3 4 5 6 7 8 9 10 11 12 13 <web-app > <display-name > Archetype Created Web Application</display-name > <servlet > <servlet-name > HelloServlet</servlet-name > <servlet-class > com.chen.HelloServlet</servlet-class > </servlet > <servlet-mapping > <servlet-name > HelloServlet</servlet-name > <url-pattern > /servlet</url-pattern > </servlet-mapping > </web-app >
4-4 HttpServlet基础
Step1:在Maven中导入相关依赖(Servlet和JSP)
1 2 3 4 5 6 7 8 9 10 <dependency > <groupId > javax.servlet</groupId > <artifactId > javax.servlet-api</artifactId > <version > 3.0.1</version > </dependency > <dependency > <groupId > javax.servlet.jsp</groupId > <artifactId > jsp-api</artifactId > <version > 2.1</version > </dependency >
Step2:创建java类,继承HttpServlet
Step3:重写doGet和doPost方法
1 2 3 4 5 6 7 8 9 10 11 12 13 14 15 16 17 18 19 public class HelloServlet extends HttpServlet {@Override protected void doGet (HttpServletRequest req, HttpServletResponse resp) throws ServletException, IOException {"DoGet方法正在被调用" );PrintWriter out = resp.getWriter();"<html>\n" +"<body>\n" +"<h2>HelloServlet</h2>\n" +"</body>\n" +"</html>" );@Override protected void doPost (HttpServletRequest req, HttpServletResponse resp) throws ServletException, IOException {
4-5 Context上下文
ServletContext 也叫做 Servlet 上下文。这个对象全局唯一且被项目类所有
Servlet 共享,所有叫全局应用程序共享对象
我们可以在ServletContext中保存全局参数。
1)ServletContext保存参数
保存参数
1 2 3 4 5 6 7 8 9 10 11 ServletContext con = this .getServletContext();String username = "CHEN" ;"username" ,username);"text/html" );"utf-8" );PrintWriter out = resp.getWriter();"<html>\n" +"<body>\n" +"<h2>设置成功</h2>\n" +"</body>\n" +"</html>" );
提取参数
1 2 3 4 5 6 7 8 9 10 11 12 13 ServletContext con = this .getServletContext();String username = (String) con.getAttribute("username" );"text/html" );"utf-8" );PrintWriter out = resp.getWriter();"<html>\n" +"<body>\n" +"<h2>名字:" + username + "</h2>\n" +"</body>\n" +"</html>" );
2)web.xml保存初始化参数
web.xml保存参数
1 2 3 4 <context-param > <param-name > msg</param-name > <param-value > this is a temporary message</param-value > </context-param >
servlet提取参数
1 2 String msg = con.getInitParameter("msg" );
3)resources保存初始化参数
properties保存参数
在资源文件夹中新建一个properties文件,保存参数信息。
例如,下面的db.properties文件
1 2 username =root password =123456
servlet提取参数
1 2 3 4 5 6 7 8 9 10 InputStream is = this .getServletContext().getResourceAsStream("/WEB-INF/classes/db.properties" );Properties prop = new Properties ();String username = prop.getProperty("username" );String password = prop.getProperty("password" );"text/html" );"UTF-8" );PrintWriter out = resp.getWriter();" -> " + password);
4-5 下载文件、验证码
下面两个实例说明了Response的基本用法。
下载文件
1 2 3 4 5 6 7 8 9 10 11 12 13 14 15 16 17 18 19 20 21 22 23 public class FileServlet extends HttpServlet {@Override protected void doGet (HttpServletRequest req, HttpServletResponse resp) throws ServletException, IOException {"text/html" );"UTF-8" );String realPath = "C:\\Users\\chenz\\Desktop\\javaweb-02-servlet\\response\\src\\main\\resources\\java.png" ;String fileName = realPath.substring(realPath.lastIndexOf("\\" ) + 1 );"Content-Disposition" , "attachment; filename=" + fileName);FileInputStream fis = new FileInputStream (realPath);ServletOutputStream sot = resp.getOutputStream();int len = 0 ;byte [] buffer = new byte [1024 ];while ((len = fis.read(buffer)) != -1 ) {0 , len);
效果:没有打开新的网页,输入网址直接下载附件
验证码
1 2 3 4 5 6 7 8 9 10 11 12 13 14 15 16 17 18 19 20 21 22 23 24 25 26 27 28 29 30 31 public class ImageServlet extends HttpServlet {@Override protected void doGet (HttpServletRequest req, HttpServletResponse resp) throws ServletException, IOException {BufferedImage image = new BufferedImage (80 ,20 ,BufferedImage.TYPE_INT_RGB);Graphics2D g = (Graphics2D)image.getGraphics();0 ,0 ,80 ,20 );new Font (null ,Font.BOLD,20 ));0 ,20 );"jpg" ,resp.getOutputStream());"image/jpeg" );"expires" ,-1 );"refresh" ,"3" );"Cache-Control" ,"no-cache" );"Pragma" ,"no-cache" );private String getNumber () {Random random = new Random ();String num = random.nextInt(9999999 ) + "" ;StringBuffer sb = new StringBuffer ();for (int i = 0 ; i < 7 -num.length(); i++) {"0" );return num;
效果:显示如下的验证码,每3秒刷新一次
4-6 表单
Index.jsp
1 2 3 4 5 6 7 8 9 10 11 12 <%@ page contentType="text/html" pageEncoding="UTF-8" language="java" %>"${pageContext.request.contextPath}/login" method = "get" >"text" name = "username" > <br>"password" name = "password" > <br>"submit" >
注意,这里使用${pageContext.request.contextPath},要求jsp版本在2.3以上;
此外,还需要更新web.xml中的配置。
1 2 3 4 5 <web-app xmlns ="http://xmlns.jcp.org/xml/ns/javaee" xmlns:xsi ="http://www.w3.org/2001/XMLSchema-instance" xsi:schemaLocation ="http://xmlns.jcp.org/xml/ns/javaee http://xmlns.jcp.org/xml/ns/javaee/web-app_4_0.xsd" version ="4.0" metadata-complete ="true" >
RequestServlet
1 2 3 4 5 6 7 8 9 10 11 12 13 14 public class RequestServlet extends HttpServlet {@Override protected void doGet (HttpServletRequest req, HttpServletResponse resp) throws ServletException, IOException {"text/html" );String username = req.getParameter("username" );String password = req.getParameter("password" );PrintWriter out = resp.getWriter();"username : " + username + "<br>" );"password : " + password + "<br>" );"/success.jsp" );
4-7 重定向和转发
请求转发(Forward):发生在服务端程序内部 ,服务器端收到客户端的请求后,先将请求转发给目标地址,再将目标地址返回的结果转发给客户端。
请求重定向(Redirect):服务器端收到客户端的请求后,给客户端返回记录了新地址的临时响应头。客户端需要再次向(重定向)的
URL 地址发送请求。
重定向
1 2 3 4 5 6 7 8 9 public class RedirectServlet extends HttpServlet {@Override protected void doGet (HttpServletRequest req, HttpServletResponse resp) throws ServletException, IOException {"/response/image" );
转发
1 2 3 4 5 6 7 8 9 10 11 12 public class ForwardServlet extends HttpServlet {@Override protected void doGet (HttpServletRequest req, HttpServletResponse resp) throws ServletException, IOException {"/image" ).forward(req, resp);@Override protected void doPost (HttpServletRequest req, HttpServletResponse resp) throws ServletException, IOException {
4-8 会话
HTTP是无状态的,一次请求结束,连接断开,下次服务器再收到请求,它就不知道这个请求是哪个用户发过来的。
但服务器需要知道http请求是哪个用户发起的,从而判断用户是否有权限继续这个请求。
这个过程就是常说的会话管理。保存会话主要有两种实现方式:Cookie 和
Session。
1)Cookie
Cookie是一种客户端技术,服务器将用户信息保存在Cookie中,并发送给客户端。
下次再次访问网址时,服务器可调用客户端Cookie中的信息。
1 2 3 4 5 6 7 8 9 10 11 12 13 14 15 16 17 18 19 20 21 22 23 24 25 public class CookieServlet extends HttpServlet {@Override protected void doGet (HttpServletRequest req, HttpServletResponse resp) throws ServletException, IOException {"text/html" );"UTF-8" );"UTF-8" );PrintWriter out = resp.getWriter();boolean vis = false ;for (Cookie cookie : cookies) {if (cookie.getName().equals("name" )) {"你的名字是" + cookie.getValue());true ;break ;if (!vis) {"这是你第一次访问本站" );new Cookie ("name" ,"chen" ));
关于Cookie:
一个Cookie只能保存一个信息,大小限制为4kb
一个浏览器最多保存300个Cookie
一个站点最多可发送20个Cookie
2)Session
Session是一种服务器技术,服务器为每个用户(浏览器)建立一个Session。
Session和Cookie一样地保存用户信息。(例如:购物车的信息)
只要浏览器没关闭,Session就一直存在,避免“一次浏览,多次登录”的情况。
1 2 3 4 5 6 7 8 9 10 11 12 13 14 15 16 17 18 19 20 21 22 23 24 public class SessionServlet extends HttpServlet {@Override protected void doGet (HttpServletRequest req, HttpServletResponse resp) throws ServletException, IOException {"text/html" );HttpSession session = req.getSession();"hobby" ,"basketball" );PrintWriter out = resp.getWriter();if (session.isNew()){"Session is new" );else {"Session is not new <br>" );"<br>" );"hobby -> " + session.getAttribute("hobby" ));
web.xml设置Session自动注销
1 2 3 4 <session-config > <session-timeout > 24*60</session-timeout > </session-config >
5 JSP
5-1 JSP原理
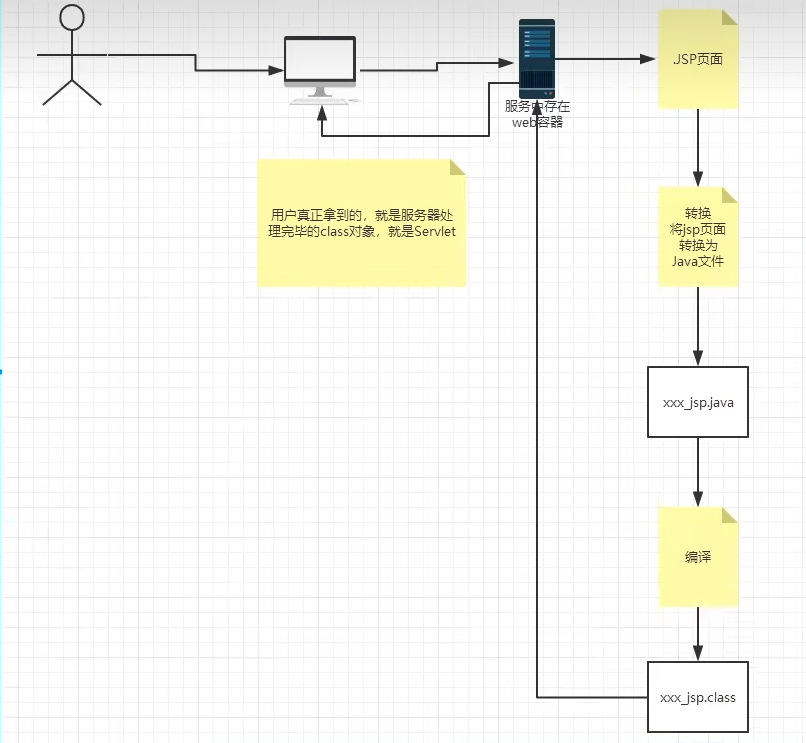
jsp本质是一个Servlet。JSP被首先被转换成Java-servlet文件,并被编译称为class字节码。用户访问的网页,实质是JSP转化并编译后的Servlet。
JSP转换为java-servlet的过程:
HTML -> out.println("HTML"); Java代码 -> 原封不动。
5-2 JSP基础语法
JSP四种基础构成
1 2 3 4 <%=JSP表达式%>
JSP表达式
1 2 3 <h1>new java .util.Date()%>
JSP代码片段
<%%> 内的代码将在jsp-Servlet类的jsp_service方法中运行输出。
1 2 3 4 5 6 7 8 9 <h2>int sum = 0 ;for (int i = 0 ; i <= 100 ; i ++){"sum == " + sum);
JSP全局声明
<%!%> 内的方法和变量将声明在jsp-servlet类中
1 2 3 4 5 6 7 8 9 10 11 12 13 14 <%!private int cnt = 1 ;private String work () {return "I am working..." + cnt;for (int i = 0 ; i < 5 ; i ++){"<br>" );
5-3 错误页面跳转
在webapp目录下,新建error文件夹以存放错误跳转的jsp。
方法1:JSP page声明
1 2 3 4 5 6 7 8 9 10 11 <%@ page contentType="text/html;charset=UTF-8" language="java" %>@page errorPage="error/500.jsp" %>int x = 1 /0 ;
此时,若该页面发生任何错误,都会跳转500.jsp页面
方法2:web.xml配置
1 2 3 4 5 6 7 8 9 10 11 12 13 <web-app > <error-page > <error-code > 500</error-code > <location > /error/500.jsp</location > </error-page > <error-page > <error-code > 404</error-code > <location > /error/404.jsp</location > </error-page > </web-app >
此时,在任意网页发生500错误,跳转500.jsp;404同理。
5-4 页面包含
1)静态包含
<%@ include file=”relativeURI”%>
可以叫作静态include(静态包含)。
本质是 “先包含,后编译” ,直接把子页面的jsp代码写入父页面了。
1 2 3 4 5 6 7 8 <%@ page contentType="text/html;charset=UTF-8" language="java" %>@include file ="header.jsp" %>@include file ="header.jsp" %>
2)动态包含
<jsp:include page=”relativeURI” flush=”true”
/> 可以叫作动态include(动态包含)
本质是 “先编译,后包含” ,本质是三个jsp同时显示。
1 2 3 4 5 6 7 8 <%@ page contentType="text/html;charset=UTF-8" language="java" %>include page = "header.jsp" />include page = "footer.jsp" />
5-5 JSP内置对象
JSP转成的Servlet中内置了9大对象,如下
out对象:用于向客户端、浏览器输出 数据。
request对象:来自客户端、浏览器的信息 。
response对象:服务器的响应信息 。
exception对象:jsp程序的异常和错误信息。
config对象:应用程序的配置信息。
page对象:当前jsp程序本身。
session对象:会话信息。
application对象:代表了当前应用程序的上下文。
pageContext对象:提供了对jsp页面所有对象 以及命名空间的访问。
其中,pageContext、request、session、application是主要的存储变量信息的四个对象,具有不同的生存期。
下面是一个参数提取示例。
1 2 3 4 5 6 7 8 9 10 11 12 13 14 15 16 17 18 19 20 21 22 23 24 25 26 27 28 29 30 <%@ page contentType="text/html;charset=UTF-8" language="java" %>"name1" ,"chen1" );"name2" ,"chen2" );"name3" ,"chen3" );"name4" ,"chen4" );"return null" String name1 = (String) pageContext.findAttribute("name1" );String name2 = (String) pageContext.findAttribute("name2" );String name3 = (String) pageContext.findAttribute("name3" );String name4 = (String) pageContext.findAttribute("name4" );String name5 = (String) pageContext.findAttribute("name5" );null
5-6 JSP、JSTL标签
JSP标签是对java代码的封装,而JSTL是对JSP原生标签的补充。
示例1:使用JSP原生标签实现forward转发
index.jsp
1 2 3 4 <jsp:forward page = "jsp1.jsp" >param name = "username" value = "chen" />param name = "password" value = "1234456" />
jsp1.jsp
1 2 3 4 5 6 7 8 <%String username = (String)request.getParameter("username" );String password = (String)request.getParameter("password" );
JSTL: JSP
标准标签库(JSTL) | 菜鸟教程
5-7 EL表达式
java----EL表达式 -
wwfy - 博客园
6 MVC架构
6-1 JavaBean
JavaBean,也叫做“实体类”,是一个满足如下要求的java类:
必须有一个无参构造
属性全为Private私有
属性有对应的set和get方法
通常来说,JavaBean类被用作 类 <->数据表 的 映射(ORM)。
比如对于下面这个表:
学生
学号
性别
年龄
小明
1
男
18
小红
2
女
20
小刚
3
男
19
新建一个Student类,来映射它。
1 2 3 4 5 6 7 8 9 10 11 12 13 14 15 16 17 18 19 20 21 22 23 public class Student {private int id;private String name;private int age;99999 ;null ;0 ;int id, String name, int age) {this .id = id;this .name = name;this .age = age;public void setId (int id_) {id = id_}public void setName (String name) { this .name = name; }public void setAge (int age) { this .age = age; }public int getId () { return id; }public String getName () { return name; }public int getAge () { return age; }
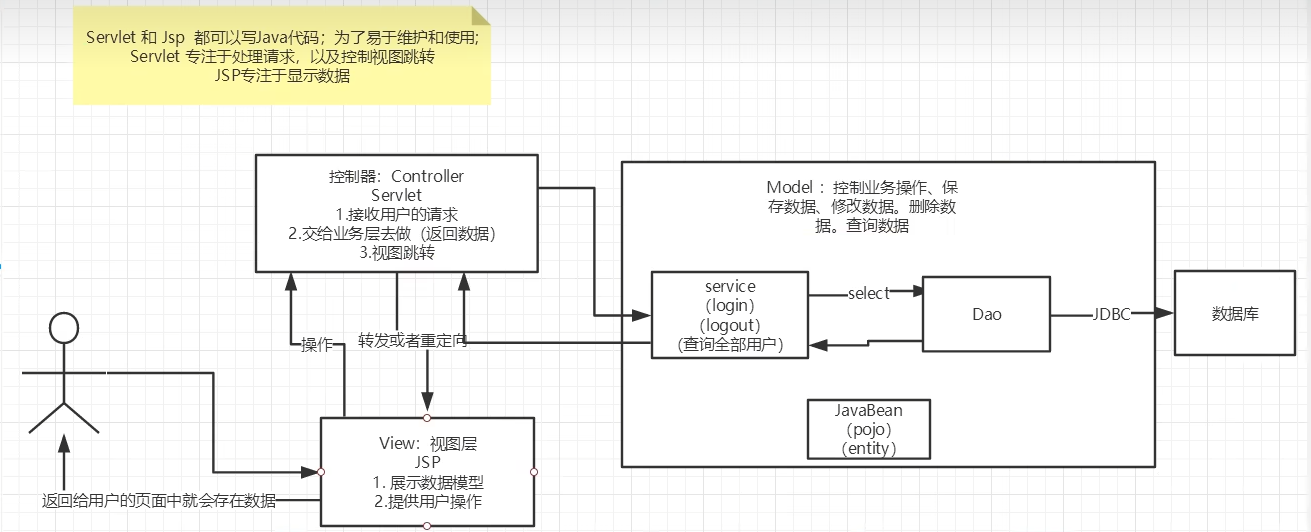
6-2 MVC架构解析
7 过滤器、监听器
7-1 Filter过滤器
Filter也称之为过滤器。
WEB开发人员通过Filter技术,对web服务器管理的所有web资源:例如Jsp,
Servlet,
静态图片文件或静态html文件等进行拦截,从而实现一些特殊的功能。
使用过滤器可以实现:权限访问控制、过滤敏感词汇、压缩响应信息等。
下面的示例,使用过滤器解决了 中文乱码问题
CharacterEncodingFilter
1 2 3 4 5 6 7 8 9 10 11 12 13 14 15 16 17 18 19 20 public class CharacterEncodingFilter implements Filter {@Override public void doFilter (ServletRequest servletRequest, ServletResponse servletResponse, FilterChain filterChain) throws IOException, ServletException {"UTF-8" );"UTF-8" );"text/html;charset=UTF-8" );"filter working..." );@Override public void destroy () {"Filter destroyed" );@Override public void init (FilterConfig filterConfig) throws ServletException {"Filter initializing" );
web.xml配置filter
1 2 3 4 5 6 7 8 9 10 11 12 13 14 15 16 17 18 19 20 21 22 23 24 25 26 <servlet > <servlet-name > ShowServlet</servlet-name > <servlet-class > com.chen.ShowServlet</servlet-class > </servlet > <servlet-mapping > <servlet-name > ShowServlet</servlet-name > <url-pattern > /filter</url-pattern > </servlet-mapping > <servlet-mapping > <servlet-name > ShowServlet</servlet-name > <url-pattern > /show</url-pattern > </servlet-mapping > <filter > <filter-name > CharacterEncodingFilter</filter-name > <filter-class > com.chen.CharacterEncodingFilter</filter-class > </filter > <filter-mapping > <filter-name > CharacterEncodingFilter</filter-name > <url-pattern > /filter/*</url-pattern > </filter-mapping >
